
“Passion is the key to extraordinary work. If you haven’t discovered your passion yet, keep searching. Don’t compromise. When you find it, you’ll know deep within your heart.”
Steve Jobs
The project DT Money is a financial management application designed to help users track their expenses, manage budgets, and gain insights into their financial health. Leveraging the power of ReactJS and TypeScript, DT Money provides a seamless, efficient, and high-performance user experience.
In this phase of the project, we will be integrating a connection with a REST API to enhance the application’s functionality.
We will utilize JSON Server to create a mock REST API, providing a quick and effective back-end solution for prototyping and development. The JSON Server offers essential features such as routing, filtering, pagination, sorting, and a database, all of which are necessary for our project. By using the provided GitHub repository, we can easily access these functionalities to support our development needs.
npm install -g json-server@0.17.4    # NPM
yarn global add json-server@0.17.4   # Yarn
npm add -g json-server@0.17.4 # PNPM{
"transactions": [
{
"id": 1,
"description": "Development of websites",
"type": "income",
"category": "Sell",
"price": 14000,
"createdAt": "2024-06-09T16:19:54.812Z"
},
{
"id": 2,
"description": "Burguer",
"type": "outcome",
"category": "Food",
"price": 50,
"createdAt": "2024-06-09T16:19:54.812Z"
}
]
}You can also add delay to this server, and change the port number if you get any errors.
npx json-server server.jsonBefore we begin, we’ll be using JSON Server to simulate the back-end of our application. In this step, our task is to load the list of transactions from the API. There are a few points we will need to consider to understand the code below:
useEffect hook from React.Imagine you are baking a cake. Some steps need you to wait, like baking the cake in the oven. Let’s see how this process would look with and without async/await.
Without async/await (using .then):
Fetch Ingredients:
goToStore()
  .then((ingredients) => {
    return mixIngredients(ingredients);
  })
  .then((batter) => {
    return bakeCake(batter);
  })
  .then((cake) => {
    console.log('Cake is ready!', cake);
  });
With async/await:
Fetch Ingredients:
async function makeCake() {
  const ingredients = await goToStore(); // Wait for the store trip to finish
  const batter = await mixIngredients(ingredients); // Wait for mixing to finish
  const cake = await bakeCake(batter); // Wait for the cake to bake

  console.log('Cake is ready!', cake);
}

makeCake();
Breaking it Down:
async function makeCake(): This function will handle our cake-making process and return a Promise.await goToStore(): We wait for the store trip to complete before moving on.await mixIngredients(ingredients): We wait for the mixing to finish before moving on.await bakeCake(batter): We wait for the baking to finish before celebrating our cake.It’s important to understand the async/await concept to relate to our API loadTransactions() function. In our scenario by default useEffect is not an async function so we need to create an async function inside the useEffect and use that function.
Because we are using Typescript we need to declare the interface and @type of our useState hook, in this case the useState hook is the only way for us to store information in a variable and be able to manage that data:
interface Transactions {
  id: number,
  description: string;
  type: 'income' | 'outcome';
  price: number;
  category: string;
  createdAt: string;
}
const [transactions, setTransactions] = useState<Transactions[]>([])
Here’s the code for Transactions/index.tsx file.
import { useEffect, useState } from "react";
import Header from "../../components/Header";
import { Summary } from "../../components/Summary";
import { SearchForm } from "./components/SearchForm";
import { PriceHighlight, TransactionsContainer, TransactionsTable } from "./styles";

interface Transactions {
  id: number,
  description: string;
  type: 'income' | 'outcome';
  price: number;
  category: string;
  createdAt: string;
}
export function Transactions() {
  const [transactions, setTransactions] = useState<Transactions[]>([])

  useEffect(() => { // useEffect can not be async
    async function loadTransactions() {
      const response = await fetch('http://localhost:3000/transactions')
      const data = await response.json();

      setTransactions(data)
    }
    loadTransactions()
  }, [])

  return (
    <div>
      <Header />
      <Summary />
      {/* Header Table */}
      <TransactionsContainer>
        <SearchForm/>
        <TransactionsTable>
          <tbody>
            {
              transactions.map(transaction => {
                return (
                  <tr key={transaction.id}>
                    <td width="50%">{transaction.description}</td>
                    <td>
                      <PriceHighlight variant={transaction.type}>
                        R$ {transaction.price}
                      </PriceHighlight>
                    </td>
                    <td>{transaction.category}</td>
                    <td>{transaction.createdAt}</td>
                  </tr>
                )
              })
            }
          </tbody>
        </TransactionsTable>
      </TransactionsContainer>
    </div>
  )
}In React, the “context” concept is a feature that allows you to share data across different components without having to pass props down manually at every level of the component tree.
Imagine you have a family living in a house, and every family member needs to know what’s for dinner. If you had to tell each person individually, it would be a lot of work, especially if you have a big family.
Instead, you could put a note on the fridge with the dinner menu. Now, anyone who needs to know what’s for dinner can just look at the fridge. This way, you don’t have to run around the house telling everyone.
In the same way, in a React application, “context” is like that note on the fridge. It’s a central place where you can put information that many parts of your application need.
In our scenario, we will be creating a context for the transaction fetch API, because we will be using this data in many areas of our application, such as Header, Summary, and Transactions index.
1. Create a new directory called contexts inside /src.
2. Create a new file called TransactionsContext.tsx
3. Move part of the code from Transactions/index.tsx into the new Context file.
Here’s the code for this file:
import { createContext, ReactNode, useEffect, useState } from "react";

// @types
interface Transaction {
  id: number,
  description: string;
  type: 'income' | 'outcome';
  price: number;
  category: string;
  createdAt: string;
}
interface TransactionContextType {
  transactions: Transaction[]; // list of transactions
}
interface TransactionsProviderProps {
  children: ReactNode; // any element valid in React
}

// Creating the Context
export const TransactionsContext = createContext({} as TransactionContextType)

// Export the Context.Provider
export function TransactionsProvider({ children }: TransactionsProviderProps) {

  const [transactions, setTransactions] = useState<Transaction[]>([])

  useEffect(() => { // useEffect can not be async
    async function loadTransactions() {
      const response = await fetch('http://localhost:3000/transactions')
      const data = await response.json();
      setTransactions(data);
    }
    loadTransactions();
  }, [])

  // Return Code
  return (
    <TransactionsContext.Provider value={{ transactions }}>
      {children}
    </TransactionsContext.Provider>
  )
}
Note: in the file above we can use the use of interface a lot, this is due to Typescript’s mandatory declaration of types.
Now let’s modify our Transactions/index.tsx file, by adding the useContext hook:
const { transactions } = useContext(TransactionsContext);import { useContext } from "react";
import Header from "../../components/Header";
import { Summary } from "../../components/Summary";
import { SearchForm } from "./components/SearchForm";
import { PriceHighlight, TransactionsContainer, TransactionsTable } from "./styles";
import { TransactionsContext } from "../../contexts/TransactionsContext";
export function Transactions() {
const { transactions } = useContext(TransactionsContext);
return (
<div>
<Header />
<Summary />
{/* Header Table */}
<TransactionsContainer>
<SearchForm/>
<TransactionsTable>
<tbody>
{
transactions.map(transaction => {
return (
<tr key={transaction.id}>
<td width="50%">{transaction.description}</td>
<td>
<PriceHighlight variant={transaction.type}>
R$ {transaction.price}
</PriceHighlight>
</td>
<td>{transaction.category}</td>
<td>{transaction.createdAt}</td>
</tr>
)
})
}
</tbody>
</TransactionsTable>
</TransactionsContainer>
</div>
)
}Another important modification we need to do is to add the <TransactionsProvider> created previously inside the App.tsx of our application.
import { ThemeProvider } from "styled-components";
import { defaultTheme } from "./styles/themes/default";
import { GlobalStyle } from "./styles/global";
import { Transactions } from "./pages/Transactions";
import { TransactionsProvider } from "./contexts/TransactionsContext";

export function App() {
  return (
    <ThemeProvider theme={defaultTheme}>
      <GlobalStyle />
      <TransactionsProvider>
        <Transactions/>
      </TransactionsProvider>
    </ThemeProvider>
  )
}In React, the reduce method is used to transform an array into a single value or a new data structure. This is achieved by applying a function to each element of the array and accumulating the results.
You start with an array of transactions where each transaction is an object. Each object has at least the following properties: type and price. The type can be either ‘income’ or ‘outcome’, and price is the numerical value of the transaction.
You want to reduce this array of transactions into a single summary object that tracks the total income, total outcome, and the net total.
We use a method called reduce to process this list of transactions and create a summary. The reduce method works by taking a function that updates an “accumulator” (a running total) as it goes through each item in the list.
1. Start with an empty summary: We begin with a summary that says we have earned R$0, spent R$0, and our total balance is R$0
{ income: 0, outcome: 0, total: 0 }2. Go through each transaction one by one:
If the transaction is income:
If the transaction is outcome:
In React, you might use reduce to manage state or process data. For example, if you have a list of orders and you want to calculate the total amount spent, you could use reduce to sum up the amounts.
const orders = [
  { id: 1, amount: 250 },
  { id: 2, amount: 150 },
  { id: 3, amount: 200 }
];

const totalAmount = orders.reduce((total, order) => total + order.amount, 0);
Here, total starts at 0, and for each order, the amount is added to total. By the end, totalAmount will be the sum of all order amounts.
Imagine you have an array of students, and each student has a name and a grade. You want to group these students by their grades into an object where the keys are the grades and the values are arrays of student names.
const students = [
  { name: 'Alice', grade: 'A' },
  { name: 'Bob', grade: 'B' },
  { name: 'Charlie', grade: 'A' },
  { name: 'David', grade: 'C' },
  { name: 'Eve', grade: 'B' },
];
Using the reduce method, we can transform this array into an object that groups students by their grades:
const groupedByGrade = students.reduce((acc, student) => {
  const { grade, name } = student;

  // If the grade doesn't exist in the accumulator, create an empty array for it
  if (!acc[grade]) {
    acc[grade] = [];
  }

  // Add the student's name to the array for their grade
  acc[grade].push(name);

  return acc;
}, {});To calculate the summary of transactions you need to use the reduce method and calculate income, outcome, and total value. Type the following code into the Summary/index.tsx file.
Here’s the code for the index.tsx:
// {income: 0, outcome: 0, total: 0} => reduzir o array (transactions) a uma nova estrutura de dados
  const summary = transactions.reduce(
    (accumulator, transaction) => {
      // Check if the transaction is of type 'income'
      if (transaction.type === 'income') {
        // Add the transaction price to the income and total
        accumulator.income += transaction.price;
        accumulator.total += transaction.price;
      } else {
        // Otherwise, add the transaction price to the outcome and subtract it from the total
        accumulator.outcome += transaction.price;
        accumulator.total -= transaction.price;
      }
      // Return the accumulator for the next iteration
      return accumulator;
    },
    {
      // Initial value of the accumulator
      income: 0,
      outcome: 0,
      total: 0
    }
);To format all values of the application we will be creating a new folder called utils containing a file called formatter.ts inside.
File formatter.ts:
// API Intly: JavaScript native API
export const dateFormatter = new Intl.DateTimeFormat('pt-BR');

export const priceFormatter = new Intl.NumberFormat('pt-BR', {
  style: 'currency',
  currency: 'BRL',
});
Now we need to edit all places that contains any dollar or R$ sign value. Go to the index.ts in the Transactions and change the code below:
From this:
<PriceHighlight variant={transaction.type}>
  R$ {transaction.price}
</PriceHighlight>
To this:
Note: we have also validated using the IF statement to check if is the ‘outcome’ variable so we can add a – (minus) sign, and we have added the format for the Date.
 <PriceHighlight variant={transaction.type}>
    {transaction.type === 'outcome' && ' -'}
    {priceFormatter.format(transaction.price)}
 </PriceHighlight>

 // Code below formats the date
 <td>{dateFormatter.format(new Date (transaction.createdAt))}</td>
Creating your own custom hooks in React allows you to encapsulate and reuse stateful logic across different components. Custom hooks start with the word “use” and can call other hooks to utilize React’s state and lifecycle features. Here’s a step-by-step explanation of how to create a custom hook in React:
1. Create a Function Starting with use:
use to ensure they follow the same naming convention as built-in hooks, which is important for React to be able to enforce the rules of hooks.2. Implement the Hook Using Built-in Hooks:
useState, useEffect, useContext, etc., to implement the desired functionality.3. Return Necessary Values:
4. Use the Custom Hook in Components:
In our application, we have also created our own hook. Create a new folder called hooks and a file called useSummary.tsx and move code from our index.tsx (Summary) into this new React hook:
import { useContext } from "react";
import { TransactionsContext } from "../contexts/TransactionsContext";

export function useSummary() {
  const { transactions } = useContext(TransactionsContext);

  // {income: 0, outcome: 0, total: 0} => reduzir o array (transactions) a uma nova estrutura de dados
  const summary = transactions.reduce(
    (accumulator, transaction) => {
      // Check if the transaction is of type 'income'
      if (transaction.type === 'income') {
        // Add the transaction price to the income and total
        accumulator.income += transaction.price;
        accumulator.total += transaction.price;
      } else {
        // Otherwise, add the transaction price to the outcome and subtract it from the total
        accumulator.outcome += transaction.price;
        accumulator.total -= transaction.price;
      }
      // Return the accumulator for the next iteration
      return accumulator;
    },
    {
      // Initial value of the accumulator
      income: 0,
      outcome: 0,
      total: 0
    }
  );

  return summary;
}
In the index.tsx (Summary) add the following code to call this hook:
import { useSummary } from "../../hooks/useSummary";

const summary = useSummary(); // importing our own hook
React Hook Form is a library that simplifies form handling in React applications. It leverages React hooks to manage form state, validation, and submission without the need for large boilerplate code. This results in more concise, readable, and performant code.
The useForm hook provided by React Hook Form is the core of the library. It is used to handle form state and validation. Here are its main functionalities:
1. Registering Inputs:
useForm allows you to register input fields and keep track of their values.const { register } = useForm();
// In your component:
<input {...register('username')} />
2. Form State Management:
const { handleSubmit, watch, formState: { errors } } = useForm();3. Validation:
<input {...register('username', { required: true, minLength: 3 })} />4. Form Submission:
handleSubmit handles form submissions and validates inputs.const onSubmit = (data) => console.log(data);
// In your form:
<form onSubmit={handleSubmit(onSubmit)}>5. Resetting Form:
reset function allows you to reset the form values.const { reset } = useForm();
// To reset the form:
<button onClick={() => reset()}>Reset</button>Zod is a TypeScript-first schema declaration and validation library. It provides a way to define the structure of data and then validate it. This can be particularly useful when combined with React Hook Form for form validation.
1. Define Schema:
import { z } from 'zod';

const schema = z.object({
  username: z.string().min(3, 'Username must be at least 3 characters long'),
  age: z.number().int().positive('Age must be a positive integer'),
});
2. Integrate with useForm:
resolver that you can use to integrate with Zod.import { useForm } from 'react-hook-form';
import { zodResolver } from '@hookform/resolvers/zod';
const { register, handleSubmit, formState: { errors } } = useForm({
resolver: zodResolver(schema),
});
const onSubmit = (data) => console.log(data);3. Form Component:
<form onSubmit={handleSubmit(onSubmit)}>
  <input {...register('username')} />
  {errors.username && <p>{errors.username.message}</p>}

  <input type="number" {...register('age')} />
  {errors.age && <p>{errors.age.message}</p>}

  <button type="submit">Submit</button>
</form>npm i react-hook-form zod
npm i @hookform/resolversconst searchFormSchema = zod.object({
query: zod.string(),
})Here, you define a schema using the zod library. The schema describes the shape of your form data and specifies validation rules. In this case:
searchFormSchema is an object schema.query, which must be a string.type SearchFormInputs = zod.infer<typeof searchFormSchema>;This line uses zod to infer a TypeScript type from the searchFormSchema.
zod.infer<typeof searchFormSchema> generates a TypeScript type that mirrors the structure of searchFormSchema.SearchFormInputs is now a type that represents an object with a single string property query.In this step, you define a React functional component named SearchForm.
1. Initialize useForm:
const { register, handleSubmit } = useForm<SearchFormInputs>({
resolver: zodResolver(searchFormSchema)
});useForm<SearchFormInputs> initializes the form and tells React Hook Form to use the SearchFormInputs type for form data.resolver: zodResolver(searchFormSchema) integrates Zod schema validation with React Hook Form. The zodResolver function ensures that the form data is validated according to the searchFormSchema rules.register: A function to register input fields.handleSubmit: A function to handle the form submission.import { MagnifyingGlass } from "phosphor-react";
import { SearchFormContainer } from "./styles";
import { useForm } from "react-hook-form";
import * as zod from 'zod';
import { zodResolver } from "@hookform/resolvers/zod";
// Schema
const searchFormSchema = zod.object({
  query: zod.string(),
})
// Return type of our schema in the form
type SearchFormInputs = zod.infer<typeof searchFormSchema>;
export function SearchForm() {
const {
register,
handleSubmit,
formState: { isSubmitting } } = useForm<SearchFormInputs>({
resolver: zodResolver(searchFormSchema)
});
async function handleSearchTransactions(data: SearchFormInputs) {
await new Promise(resolve => setTimeout(resolve, 2000)) // resolver a promessa apos 2 segundos com objetivo simular API
console.log(data);
}
return (
<SearchFormContainer onSubmit={handleSubmit(handleSearchTransactions)}>
<input
type="text"
placeholder="Search for a transaction"
{...register('query')}
/>
<button disabled={isSubmitting}>
<MagnifyingGlass size={20} />
Search
</button>
</SearchFormContainer>
)
}React Hook Form has a feature called Controller. The controller is used to wrap third-party form components (not native ones) or custom components, so they can integrate smoothly with React Hook Form’s validation and state management. Essentially, it acts as a bridge between React Hook Form and non-standard form elements.
Radix Radio Group
Radix is a library of accessible UI components. In this context, we’re using Radix’s TransactionType and TransactionTypeButton components to create a radio group for selecting the type of transaction (either “income” or “outcome”).
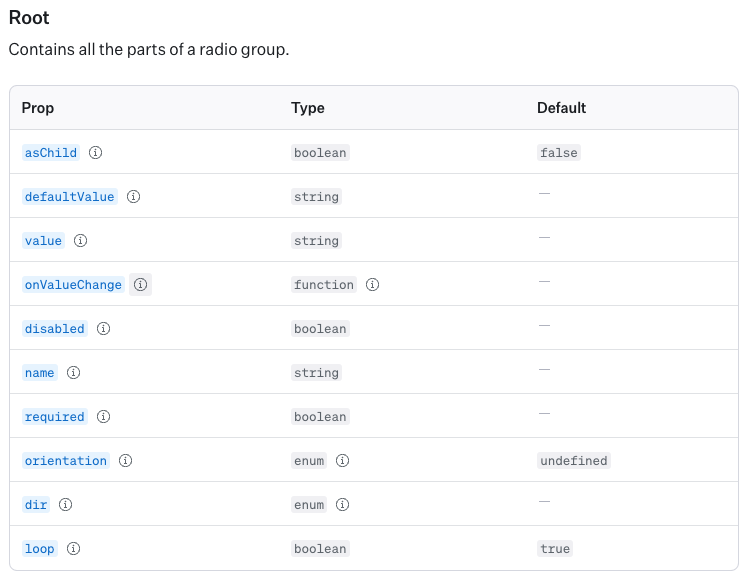
onValueChange is an event handler called when the value changes.
import * as Dialog from '@radix-ui/react-dialog';
import { CloseButton, Content, Overlay, TransactionType, TransactionTypeButton } from './styles';
import { ArrowCircleDown, ArrowCircleUp, X } from 'phosphor-react';
import * as zod from 'zod';
import { zodResolver } from "@hookform/resolvers/zod";
import { Controller, useForm } from 'react-hook-form';

// Schema
const newTransactionFormSchema = zod.object({
  description: zod.string(),
  price: zod.number(),
  category: zod.string(),
  type: zod.enum(['income', 'outcome'])
})

type NewTransactionFormInputs = zod.infer<typeof newTransactionFormSchema>;

export default function NewTransactionModal() {

  const {
    control,
    register,
    handleSubmit,
    formState: {
      isSubmitting
    }
  } = useForm<NewTransactionFormInputs>({
    resolver: zodResolver(newTransactionFormSchema),
    defaultValues: {
      type: 'income'
    },
  })

  async function handleCreateNewTransaction(data: NewTransactionFormInputs) {
    await new Promise(resolve => setTimeout(resolve, 2000)) // resolver a promessa apos 2 segundos com objetivo simular API

    console.log(data)
  }

  return (
    <Dialog.Portal>
      <Overlay/>
      <Content>
        <Dialog.Title>New Transaction</Dialog.Title>
        <CloseButton>
          <X size={24}/>
        </CloseButton>

        <form onSubmit={handleSubmit(handleCreateNewTransaction)}>
          <input
            type="text"
            placeholder='Description'
            required
            {... register('description')}
          />
          <input
            type="number"
            placeholder='Price'
            required
            {... register('price', {valueAsNumber: true})}
          />
          <input
            type="text"
            placeholder='Category'
            required
            {... register('category')}
          />

          <Controller
            control={control}
            name='type'
            render={({field}) => {
              return (
                <TransactionType onValueChange={field.onChange} value={field.value}>
                  <TransactionTypeButton variant='income' value='income'>
                    <ArrowCircleUp size={24} />
                    Income
                  </TransactionTypeButton>
                  <TransactionTypeButton variant='outcome' value='outcome'>
                    <ArrowCircleDown size={24} />
                    Outcome
                  </TransactionTypeButton>
                </TransactionType>
              )
            }}
          />

          <button type='submit' disabled={isSubmitting}>
            Register
          </button>
        </form>

      </Content>
    </Dialog.Portal>
  )
}
In summary:
Controller helps integrate non-standard form components.TransactionType and TransactionTypeButton create an accessible and styled radio group.Controller component ensures that this radio group correctly reads and updates the form state managed by React Hook Form.Code explanations:
control={control}: This prop connects the Controller to the form state managed by React Hook Form. The control object is provided by the useForm hook.name='type': This is the name of the form field, in this case, ‘type’. It corresponds to the value in the form state.render={({ field }) => { ... }: The render prop takes a function that receives field-related props (like field). These props help integrate the custom component with the React Hook Form.onValueChange={field.onChange}: This ensures that when a radio button is selected, the form state is updated accordingly.value={field.value}: This sets the current value of the radio group based on the form state.Introduction to Axios
Axios is a popular JavaScript library used to make HTTP requests from a browser or Node.js. It simplifies the process of interacting with APIs and handling responses. Axios is often preferred over the native fetch API because it offers a cleaner syntax and additional features like request and response interceptors, automatic JSON transformation, and better error handling.
1. Install AXIOS library:
$ npm install axios2. Create a new folder called lib and inside add a file called axios.ts.
3. Code Explanation:
const response = await api.get('transactions', {
  params: {
    q: query
  }
});api.get:
axios instance (api) to make a GET request. GET is an HTTP method used to request data from a server.'transactions':
/transactions.{ params: { q: query } }:
get method.params: This key is used to define query parameters for the request.q: query: This sets the query parameter q to the value of the query variable. Query parameters are often used to filter or search data on the server. For example, if query is "income", the request URL might look like this: http://yourapi.com/transactions?q=income.await:
api.get to resolve. It allows you to write asynchronous code that looks synchronous, making it easier to read and maintain. The await a keyword can only be used inside an async function.const response:
await api.get(...) the call is assigned to the response variable. This response the object contains various properties, including data, which holds the data returned from the API.Axios.ts file:
import axios from "axios";

export const api = axios.create({
  baseURL: 'http://localhost:3000',
});
TransactionsContext file:
import { createContext, ReactNode, useEffect, useState } from "react";
import { api } from "../lib/axios";

// @types
interface Transaction {
  id: number,
  description: string;
  type: 'income' | 'outcome';
  price: number;
  category: string;
  createdAt: string;
}
interface TransactionContextType {
  transactions: Transaction[]; // list of transactions
  fetchTransactions: (query?: string) =>  Promise<void>;
}
interface TransactionsProviderProps {
  children: ReactNode; // any element valid in React
}

// Creating the Context
export const TransactionsContext = createContext({} as TransactionContextType)

// Export the Context.Provider
export function TransactionsProvider({ children }: TransactionsProviderProps) {
  const [transactions, setTransactions] = useState<Transaction[]>([])

  async function fetchTransactions(query?: string) {
    const response = await api.get('transactions', {
      params: {
        _sort: 'createdAt',
        _order: 'desc',
        q: query
      }
    })

    setTransactions(response.data);
  }

  useEffect(() => { // useEffect can not be async
    fetchTransactions();
  }, [])

  // Return Code
  return (
    <TransactionsContext.Provider value={{ transactions, fetchTransactions }}>
      {children}
    </TransactionsContext.Provider>
  )
}To ensure our functionality is not tied to a specific modal or dialog component, we will create the function to add new transactions within the context. This approach prevents potential issues that could arise from coupling our functionality with a single modal or dialog.
Additionally, we have created a new interface for the function’s props that mirrors the structure of the dialog component’s props, maintaining consistency and flexibility.
Breaking It Down
1. Function Declaration:
2. Destructuring the data Object:
3. Making the POST Request:
description, price, category, type, and createdAt (which is set to the current date and time).4. Updating State:
Putting It All Together
Here’s a step-by-step explanation of what happens when createTransaction is called:
1. Receive Data:
2. Send POST Request:
3. Handle Response:
4. Update State:
Updated TransactionsContext.ts file:
import { createContext, ReactNode, useEffect, useState } from "react";
import { api } from "../lib/axios";

// @types
interface Transaction {
  id: number,
  description: string;
  type: 'income' | 'outcome';
  price: number;
  category: string;
  createdAt: string;
}
interface CreateTransactionInput {
  description: string;
  price: number;
  category: string;
  type: 'income' | 'outcome';
}
interface TransactionContextType {
  transactions: Transaction[]; // list of transactions
  fetchTransactions: (query?: string) => Promise<void>;
  createTransaction: (data: CreateTransactionInput) => Promise<void>;
}
interface TransactionsProviderProps {
  children: ReactNode; // any element valid in React
}

// Creating the Context
export const TransactionsContext = createContext({} as TransactionContextType)

// Export the Context.Provider
export function TransactionsProvider({ children }: TransactionsProviderProps) {
  const [transactions, setTransactions] = useState<Transaction[]>([])

  async function fetchTransactions(query?: string) {
    const response = await api.get('transactions', {
      params: {
        _sort: 'createdAt',
        _order: 'desc',
        q: query
      }
    })

    setTransactions(response.data);
  }

  async function createTransaction(data: CreateTransactionInput) {
    const { description, price, category, type } = data;

    const response = await api.post('transactions', {
      description,
      price,
      category,
      type,
      createdAt: new Date(),
    })

    setTransactions(state => [response.data, ...state]);
  }

  useEffect(() => { // useEffect can not be async
    fetchTransactions();
  }, [])

  // Return Code
  return (
    <TransactionsContext.Provider value={{ transactions, fetchTransactions, createTransaction }}>
      {children}
    </TransactionsContext.Provider>
  )
}
Updated NewTransactionModal
import * as Dialog from '@radix-ui/react-dialog';
import { CloseButton, Content, Overlay, TransactionType, TransactionTypeButton } from './styles';
import { ArrowCircleDown, ArrowCircleUp, X } from 'phosphor-react';
import * as zod from 'zod';
import { zodResolver } from "@hookform/resolvers/zod";
import { Controller, useForm } from 'react-hook-form';
import { api } from '../../lib/axios';
import { useContext } from 'react';
import { TransactionsContext } from '../../contexts/TransactionsContext';

// Schema
const newTransactionFormSchema = zod.object({
  description: zod.string(),
  price: zod.number(),
  category: zod.string(),
  type: zod.enum(['income', 'outcome'])
})

type NewTransactionFormInputs = zod.infer<typeof newTransactionFormSchema>;

export default function NewTransactionModal() {

  const {createTransaction} = useContext(TransactionsContext)

  const {
    control,
    register,
    handleSubmit,
    reset,
    formState: {
      isSubmitting
    }
  } = useForm<NewTransactionFormInputs>({
    resolver: zodResolver(newTransactionFormSchema),
    defaultValues: {
      type: 'income'
    },
  })

  async function handleCreateNewTransaction(data: NewTransactionFormInputs) {
    //await new Promise(resolve => setTimeout(resolve, 2000)) // resolver a promessa apos 2 segundos com objetivo simular API
    const { description, price, category, type } = data;

    await createTransaction({
      description,
      price,
      category,
      type
    });

    reset();
  }

  return (
    <Dialog.Portal>
      <Overlay/>
      <Content>
        <Dialog.Title>New Transaction</Dialog.Title>
        <CloseButton>
          <X size={24}/>
        </CloseButton>

        <form onSubmit={handleSubmit(handleCreateNewTransaction)}>
          <input
            type="text"
            placeholder='Description'
            required
            {... register('description')}
          />
          <input
            type="number"
            placeholder='Price'
            required
            {... register('price', {valueAsNumber: true})}
          />
          <input
            type="text"
            placeholder='Category'
            required
            {... register('category')}
          />

          <Controller
            control={control}
            name='type'
            render={({field}) => {
              return (
                <TransactionType onValueChange={field.onChange} value={field.value}>
                  <TransactionTypeButton variant='income' value='income'>
                    <ArrowCircleUp size={24} />
                    Income
                  </TransactionTypeButton>
                  <TransactionTypeButton variant='outcome' value='outcome'>
                    <ArrowCircleDown size={24} />
                    Outcome
                  </TransactionTypeButton>
                </TransactionType>
              )
            }}
          />

          <button type='submit' disabled={isSubmitting}>
            Register
          </button>
        </form>

      </Content>
    </Dialog.Portal>
  )
}Install ESLINT from Rockeseat
npm i eslint @rocketseat/eslint-config -DCreate a file in the root of the project: eslintrc.json
Run in the terminal:
npx eslint src --ext .tsx, .tsInstall a library to avoid rendering child components in the context all the time, improving performance in the application.
npm install use-context-selector react schedulerimport { createContext } from "use-context-selector";
// Creating the Context
export const TransactionsContext = createContext({} as TransactionContextType)Now, we need to change all useContext hooks to useContextSelector as shown below:
const transactions = useContextSelector(TransactionsContext, (context) => {
    return context.transactions
});
When a context value is changed, all components that useContext will re-render.
To solve this issue, useContextSelector is proposed and later proposed Speculative Mode with context selector support. This library provides the API in userland.
Is a React hook that returns a memorized version of the callback function that only changes if one of the dependencies has changed. This is useful to prevent unnecessary re-renders of re-creations of functions when a component re-renders.
const createTransaction = useCallback(
    async (data: CreateTransactionInput) => {
      const { description, price, category, type } = data;
      const response = await api.post('transactions', {
        description,
        price,
        category,
        type,
        createdAt: new Date(),
      })
      setTransactions(state => [response.data, ...state]);
    }, [],
)Using useCallback ensures that createTransaction maintains a stable reference between renders. This can be beneficial in several scenarios:
Add the code to the fetchTransactions function
const fetchTransactions = useCallback(
    async (query?: string) => {
      const response = await api.get('transactions', {
        params: {
          _sort: 'createdAt',
          _order: 'desc',
          q: query
        }
      })
      setTransactions(response.data);
    }, [],
)memo is a higher-order component that you wrap around your component. It tells React to only re-render the component if its props OR hooks have changed. If the props stay the same, React will skip the re-render, saving time and resources.
Por que que um component renderiza?
- Hooks changed (mudou estado, contexto, reducer)
- Props changes (mudou propriedades)
- Parent rerendered (component pai renderizou)

Qual o fluxo de renderizacao?
1. O React recria o HTML da interface daquele componente
2. Compara a versao do HTML recriada com a versao anterior
3. SE mudou alguma coisa, ele reescreve o HTML na tela

Memo:
0. Hooks changed, Props changed (deep comparison)
0.1: Comparar com a versao anterior dos hooks e this.props
0.2: SE mudou algo, ele vai permitir a nova renderizacao SE NAO mudar nada nao entra no fluxo acima
This is how you can use the MEMO below:
import React, { memo } from 'react';

const MyComponent = (props) => {
  // Component logic and JSX here
  return <div>{props.name}</div>;
};

export default memo(MyComponent);
The useMemo hook in React is used to optimize performance by memoizing expensive calculations. It ensures that a function only recalculates a value when one of its dependencies changes, thus avoiding unnecessary computations on every render.
import React, { useMemo } from 'react';

const MyComponent = ({ number }) => {
  // Expensive calculation
  const squaredNumber = useMemo(() => {
    console.log('Calculating...');
    return number * number;
  }, [number]); // Dependencies array

  return <div>Squared Number: {squaredNumber}</div>;
};

export default MyComponent;
useMemo. Pass the function that performs the calculation as the first argument.useMemo will only recalculate the value if one of these dependencies changes. If number changes, useMemo will recalculate the squared number. Otherwise, it will use the memoized value from the previous render.Note that in our application the summary variable will only be re-created when transactions change:
// {income: 0, outcome: 0, total: 0} => reduzir o array (transactions) a uma nova estrutura de dados
  const summary = useMemo(() => {
    transactions.reduce(
      (accumulator, transaction) => {
        // Check if the transaction is of type 'income'
        if (transaction.type === 'income') {
          // Add the transaction price to the income and total
          accumulator.income += transaction.price;
          accumulator.total += transaction.price;
        } else {
          // Otherwise, add the transaction price to the outcome and subtract it from the total
          accumulator.outcome += transaction.price;
          accumulator.total -= transaction.price;
        }
        // Return the accumulator for the next iteration
        return accumulator;
      },
      {
        // Initial value of the accumulator
        income: 0,
        outcome: 0,
        total: 0
      }
    );
  },[transactions]
)Check similiar articles below 🚀