
GitHub: https://github.com/ruivergani/dashboard-shop-web
In this lesson, we will connect the front-end of our project to the back-end that we previously created using Bun. Bun is an alternative to Node and Deno, and the main difference is that it is built on top of JavaScript Core, while Node is built on top of Chrome’s V8.
Bun generally performs better in many tasks. We recommend running Bun within the Linux subsystem on Windows using WSL. You can install Bun globally on your machine and clone the project. You will need to create a .env.local file and configure the database URL.
We recommend using Docker to run Postgres. After installing the dependencies and running the migrations, you can run bun seed to pre-populate the database with dummy data. Finally, you can run bun dev to start the application on localhost.
Here’s the link for you to install Bun: https://bun.sh/
1. Download and Install Docker from this website: https://www.docker.com/
2. Download and Install Bun.
3. Clone the Github API Repo: https://github.com/rocketseat-education/pizzashop-api
// terminal

git clone https://github.com/rocketseat-education/pizzashop-api.git

// run containers in background

pizzashop-api % docker compose up -d

docker ps
This project depends on Docker to setup database. With Docker installed, clone the project, install dependencies, setup Docker containers and run the application.
bun i // install dependencies
docker compose up -d // run docker container
bun migrate // get database migration
bun seed // populate database
bun devIn this lesson, we will create our API Client using Axios to make HTTP requests from the frontend to the backend. We will start by installing Axios and creating an axios.ts file to export our API.
pnpm i axiosNext, we will create a .env.local file to store the environment variables, including the backend URL.
// .env.local

VITE_API_URL="http://localhost:3333"
To handle the environment variables, we will create an env.ts file and use Zod to validate them before using them. Now, we can use the environment variable in the axios.ts file.
// env.ts = to validate the environment variables

import { z } from "zod"

const envSchema = z.object({
  VITE_API_URL: z.string().url(),
})

export const env = envSchema.parse(import.meta.env)
Next, we will configure React Query, a tool that facilitates requests between the frontend and the backend, in addition to providing features for remembering and invalidating requests. We will create a react-query.ts file to export a Query Client and configure it in the app.tsx file. With this, our application will be ready to make requests from the frontend to the backend.
React Query is a powerful data-fetching library for React applications that simplifies managing server state. It provides features such as:
Overall, React Query helps streamline data management in React applications, reducing the need for boilerplate code and improving the user experience with efficient data handling.
Create a file under the lib folder:
// react-query.ts

import { QueryClient } from "@tanstack/react-query"

export const queryClient = new QueryClient()
Update the app.tsx file so all routes have access to the React Query:
// App.tsx

import "./global.css"

import { QueryClientProvider } from "@tanstack/react-query"
import { Helmet, HelmetProvider } from "react-helmet-async"
import { RouterProvider } from "react-router-dom"
import { Toaster } from "sonner"

import { ThemeProvider } from "./components/theme/theme-provider"
import { queryClient } from "./lib/react-query"
import { router } from "./routes"

export function App() {
  return (
    <ThemeProvider storageKey="pizzashop-theme">
      <HelmetProvider>
        <Helmet titleTemplate="%s | Pizza Web Shop" />
        <Toaster richColors />
        <QueryClientProvider client={queryClient}>
          <RouterProvider router={router} />
        </QueryClientProvider>
      </HelmetProvider>
    </ThemeProvider>
  )
}In this lesson, we will connect the front-end authentication functionality with the back-end. We will create a function called handleSignIn that will make an authentication request to the back-end.
Create a folder called /src/api and a file called sign-in.ts:
// sign-in.ts

import { api } from "../lib/axios"

export interface SignInBody {
  email: string
}

export async function signIn({ email }: SignInBody) {
  await api.post("/authenticate", { email })
}
To keep the communication between the front-end and the back-end typed, we will create a sign-in.ts file inside the API folder, where we will have a function that uses Axios to make the POST request to the back-end’s authenticate route, sending the user’s email as a parameter.
We will use ReactQuery and the useMutation function to make this request, which returns important information about the request, such as the status and whether there was an error.
The useMutation hook is a feature provided by libraries like Apollo Client for React to handle GraphQL mutations. Mutations are operations that modify data on the server, such as creating, updating, or deleting records. The useMutation hook simplifies the process of making these operations and handling their results in a React application.
mutationFn: signIn: This specifies the function to be called when the mutation is executed. In this case, signIn is the function that performs the mutation.mutateAsync: This is a function that will execute the signIn mutation asynchronously. By destructuring it with the alias authenticate, you can call authenticate in your component to perform the sign-in operation.const { mutateAsync: authenticate } = useMutation({
mutationFn: signIn,
})We will use mutateAsync to call the authentication function. ReactQuery allows us to customize the behavior of the request, such as defining several attempts in case of failure. For now, we will focus on the first requests and explore more features of ReactQuery later.
Update the handleSignIn function:
async function handleSignIn(data: signInForm) {
    try {
      await authenticate({ email: data.email })

      toast.success("Sent an authentication link to your e-mail.", {
        action: {
          label: "Send again",
          onClick: () => handleSignIn(data),
        },
      })
    } catch {
      toast.error("Try again, unexpected error occured.")
    }
}
To test you can access /sign-in and add the e-mail generated by seed.
If you inspect the tool and go into the Network tab you can see the Header with Status code 200 and also the Payload sent.
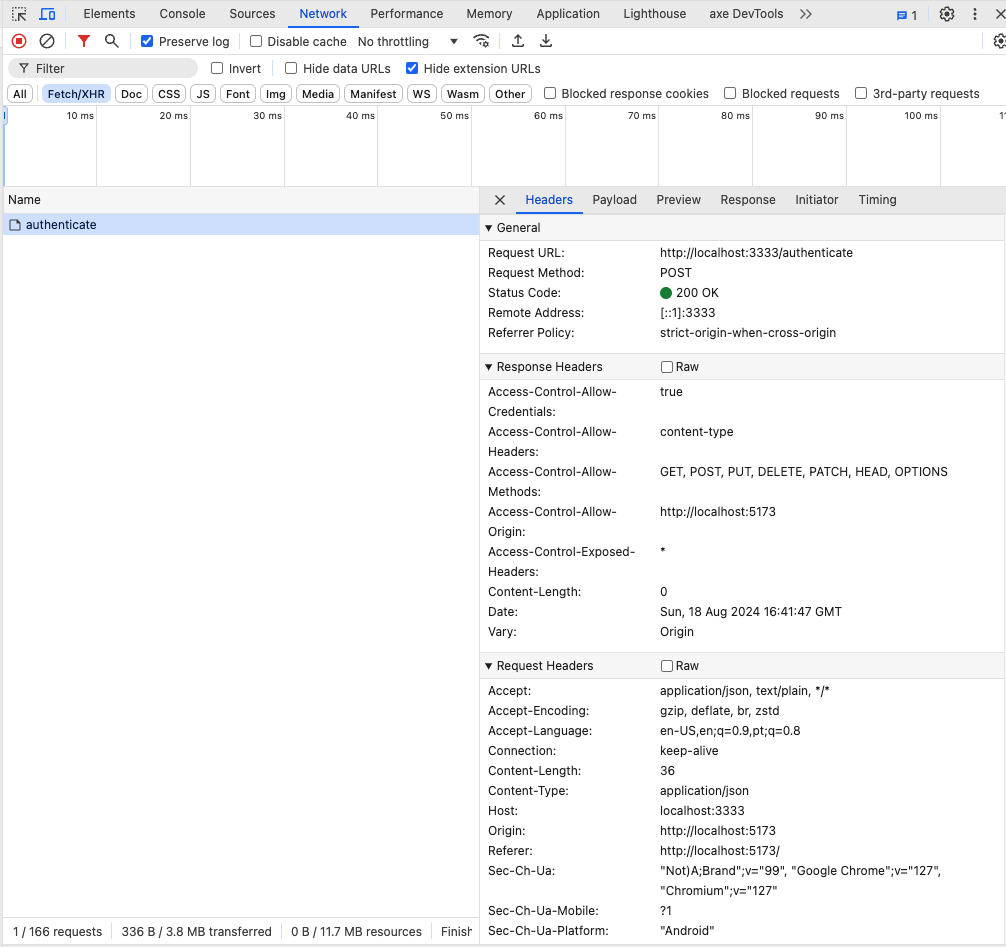
Now the API has sent a console.log containing a URL that has the link for the front end of the application.

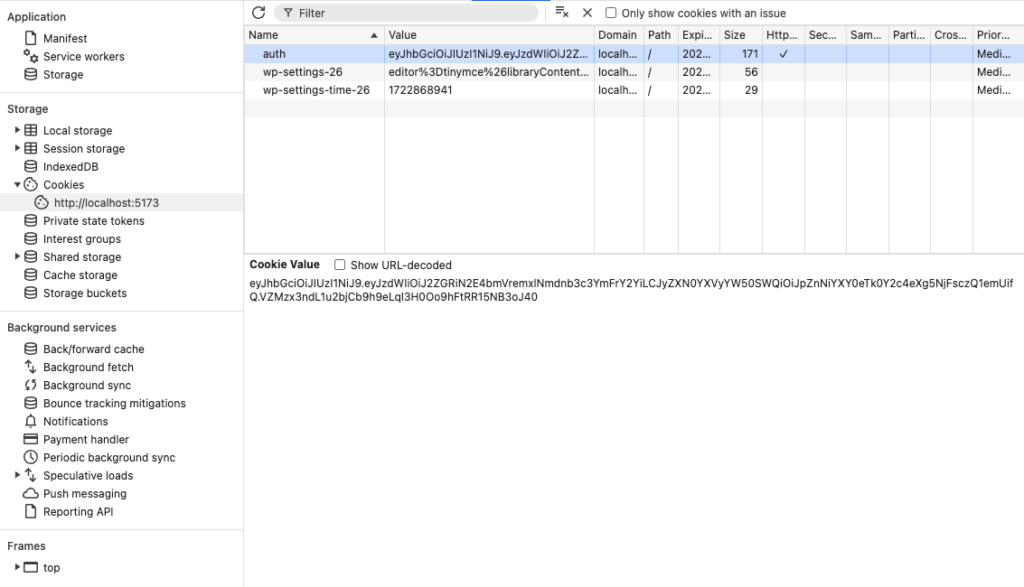
By clicking on this link you can access the token of authentication as HttpOnly, not being accessible by the document of the application.
In this lesson, we will create the application’s registration process, following the same pattern used for login. We will create a file called “register-restaurant.ts” to handle restaurant registration.
import { api } from "../lib/axios"

export interface RegisterRestaurantBody {
  restaurantName: string
  managerName: string
  email: string
  phone: string
}

export async function registerRestaurant({
  restaurantName,
  managerName,
  email,
  phone,
}: RegisterRestaurantBody) {
  await api.post("/restaurants", { restaurantName, managerName, email, phone })
}
We will copy the code from the login file and replace all occurrences of “sign-in” with “registerRestaurant”. We will add some extra information, such as the restaurant name, manager’s name, email and phone number. We will make a POST request to the “/restaurant” route sending this information.
// sign-up.tsx

import { useMutation } from "@tanstack/react-query"
import { registerRestaurant } from "@/api/register-restaurant"

const { mutateAsync: registerRestaurantFn } = useMutation({
    mutationFn: registerRestaurant,
})

async function handleSignUp(data: signUpForm) {
    try {
      await registerRestaurantFn({
        restaurantName: data.restaurantName,
        managerName: data.managerName,
        phone: data.phone,
        email: data.email,
      })
      toast.success("Restaurant registered successfully.", {
        action: {
          label: "Login",
          onClick: () => navigate(`/sign-in?email=${data.email}`),
        },
      })
    } catch {
      toast.error(
        "Error when registering you as our partner. Try again, unexpected error occured.",
      )
    }
}
We will keep the code more visual, even if it seems repetitive. When the registration is finished, we will redirect the user to the login page, and the email will be automatically filled in. The part of the code below send the e-mail via URL.
// this code sends the e-mail via URL

onClick: () => navigate(`/sign-in?email=${data.email}`)

// this will be modified in sign-in.tsx to add defaultValues (defaultValue of the field email)

const {
    register,
    handleSubmit,
    formState: { isSubmitting },
  } = useForm<signInForm>({
    defaultValues: {
      email: searchParams.get("email") ?? "",
    },
})In this lesson, we will implement features that require the user to be logged in. First, we will log in using a specific email address. Then, we will make requests to the backend to get data from the logged-in user’s profile. Let’s start by modifying the static part of the “header” component of our application.
We will create a function called “getProfile” to retrieve the data from the currently logged-in profile. We will use ReactQuery to make the request and the queryKey to uniquely identify this request.
Next, we will make a request to get the data from the restaurant managed by the logged-in user. Finally, we will display this data in the interface.
1. Create a file called get-profile.ts:
import { api } from "@/lib/axios"

export interface GetProfileResponse {
  id: string
  name: string
  email: string
  phone: string | null
  role: "manager" | "customer"
  createdAt: Date | null
  updatedAt: Date | null
}

export async function getProfile() {
  const response = await api.get<GetProfileResponse>("/me")

  return response.data
}
Go to the account-menu.tsx file, and add the following code using the useQuery hook, which is part of React Query (or TanStack Query), a popular data-fetching and state management library for React.
React Query uses this key to manage caching, refetching, and sharing of data across different parts of your application.
data property, which you’ve renamed to profile for easier use.const { data: profile } = useQuery({
queryKey: ["profile"], // identification for the same request in different places
queryFn: getProfile,
})Modify axios so that the cookies from the front are automatically sent to the backend:
import axios from "axios"
import { env } from "@/env"
export const api = axios.create({
baseURL: env.VITE_API_URL,
withCredentials: true,
})The code for the account-menu.tsx can be found below:
import { useQuery } from "@tanstack/react-query"
import { Building, ChevronDown, LogOut } from "lucide-react"
import { getManagedRestaurant } from "@/api/get-managed-restaurant"
import { getProfile } from "@/api/get-profile"
import { Button } from "./ui/button"
import {
DropdownMenu,
DropdownMenuContent,
DropdownMenuItem,
DropdownMenuLabel,
DropdownMenuSeparator,
DropdownMenuTrigger,
} from "./ui/dropdown-menu"
export function AccountMenu() {
const { data: profile } = useQuery({
    queryKey: ["profile"], // identification for the same request in different places
    queryFn: getProfile,
  })
const { data: managedRestaurant } = useQuery({
queryKey: ["managed-restaurant"], // identification for the same request in different places
queryFn: getManagedRestaurant,
})
return (
<DropdownMenu>
<DropdownMenuTrigger asChild>
<Button
variant="outline"
className="flex select-none items-center gap-2"
>
{managedRestaurant?.name}
<ChevronDown size={16}></ChevronDown>
</Button>
</DropdownMenuTrigger>
<DropdownMenuContent
align="end"
className="w-56"
>
<DropdownMenuLabel className="flex flex-col">
<span>{profile?.name}</span>
<span className="text-xs font-normal text-muted-foreground">
{profile?.email}
</span>
</DropdownMenuLabel>
<DropdownMenuSeparator />
<DropdownMenuItem>
<Building className="mr-2 h-4 w-4"></Building>
<span>Shop Profile</span>
</DropdownMenuItem>
<DropdownMenuItem className="text-rose-500 dark:text-rose-400">
<LogOut className="mr-2 h-4 w-4"></LogOut>
<span>Exit</span>
</DropdownMenuItem>
</DropdownMenuContent>
</DropdownMenu>
)
}In this lesson, we will explore a React Query feature called isLoading, which lets us know when data is being loaded.
Before React Query, we would have to create a state for each request and check if it is loading or if an error occurred. With React Query, we can access this information directly.
We will use the Skeleton component to display a loading effect while the data is being fetched. We will also explore options for simulating slower loading, either by throttling the internet speed or adding a delay to requests using an Axios interceptor. These techniques are important for providing a better user experience and handling loading states in our applications.
pnpm dlx shadcn-ui@latest add skeletonWhen you are doing a Loading State is important to understand the component skeleton or shimmer effect, that avoids the spinner in the screen.

Adding an if statement for the isLoading from React Query will be sufficient for the Skeleton effect improving the user experience. IsLoading has been renamed for isLoadingManagedRestaurant in this case.
// React Query
const { data: managedRestaurant, isLoading: isLoadingManagedRestaurant } = useQuery({
queryKey: ["managed-restaurant"], // identification for the same request in different places
queryFn: getManagedRestaurant,
}){isLoadingManagedRestaurant ? <Skeleton className="h-4 w-40"/> : managedRestaurant?.name}
<DropdownMenuLabel className="flex flex-col">
{isLoadingProfile ? (
<div className="space-y-1.5">
<Skeleton className="h-4 w-32" />
<Skeleton className="h-3 w-24" />
</div>
) : (
<>
<span>{profile?.name}</span>
<span className="text-xs font-normal text-muted-foreground">
{profile?.email}
</span>
</>
)}
</DropdownMenuLabel>For you to test the application we will be adding a delay for the API data to reach our frontend, since all the code is done locally this could be really fast.
Create environment variable:
// .env.local
VITE_API_URL="http://localhost:3333"
VITE_ENABLE_API_DELAY=trueConvert the string() from environment variable to boolean (all are string by default)
// .env.ts
import { z } from "zod"
const envSchema = z.object({
VITE_API_URL: z.string().url(),
VITE_ENABLE_API_DELAY: z.string().transform(value => value === "true"),
})
export const env = envSchema.parse(import.meta.env)In the Axios file, we will be adding a delay before all requests from AXIOS:
// axios.ts
import axios from "axios"

import { env } from "@/env"

export const api = axios.create({
  baseURL: env.VITE_API_URL,
  withCredentials: true,
})
if (env.VITE_ENABLE_API_DELAY) {
api.interceptors.request.use(async config => {
await new Promise(resolve => setTimeout(resolve, 2000))
return config
})
}In this lesson, we’ll create a modal for updating a profile. We’ll use React’s Dialog component to create the modal.
Inside the Dialog, we’ll have the content for the modal, which we’ll separate into a component called StoreProfileDialog. The modal will have a header with the title “Store Profile” and a description.
Below the header, we’ll have a form with fields for the restaurant’s name and description. We’ll also have cancel and save buttons. We’ll use React Query to load the restaurant’s data and React Hook Form to handle the form.
1. Create the modal Dialog, Trigger, and Content
// account-menu.tsx

import { useQuery } from "@tanstack/react-query"
import { Building, ChevronDown, LogOut } from "lucide-react"

import { getManagedRestaurant } from "@/api/get-managed-restaurant"
import { getProfile } from "@/api/get-profile"

import { StoreProfileDialog } from "./store-profile-dialog"
import { Button } from "./ui/button"
import { Dialog, DialogTrigger } from "./ui/dialog"
import {
  DropdownMenu,
  DropdownMenuContent,
  DropdownMenuItem,
  DropdownMenuLabel,
  DropdownMenuSeparator,
  DropdownMenuTrigger,
} from "./ui/dropdown-menu"
import { Skeleton } from "./ui/skeleton"

export function AccountMenu() {
  const { data: profile, isLoading: isLoadingProfile } = useQuery({
    queryKey: ["profile"], // identification for the same request in different places
    queryFn: getProfile,
  })
  const { data: managedRestaurant, isLoading: isLoadingManagedRestaurant } =
    useQuery({
      queryKey: ["managed-restaurant"], // identification for the same request in different places
      queryFn: getManagedRestaurant,
    })

  return (
    <Dialog>
      <DropdownMenu>
        <DropdownMenuTrigger asChild>
          <Button
            variant="outline"
            className="flex select-none items-center gap-2"
          >
            {isLoadingManagedRestaurant ? (
              <Skeleton className="h-4 w-40" />
            ) : (
              managedRestaurant?.name
            )}
            <ChevronDown size={16}></ChevronDown>
          </Button>
        </DropdownMenuTrigger>
        <DropdownMenuContent
          align="end"
          className="w-56"
        >
          <DropdownMenuLabel className="flex flex-col">
            {isLoadingProfile ? (
              <div className="space-y-1.5">
                <Skeleton className="h-4 w-32" />
                <Skeleton className="h-3 w-24" />
              </div>
            ) : (
              <>
                <span>{profile?.name}</span>
                <span className="text-xs font-normal text-muted-foreground">
                  {profile?.email}
                </span>
              </>
            )}
          </DropdownMenuLabel>
          <DropdownMenuSeparator />
          <DialogTrigger asChild>
            <DropdownMenuItem>
              <Building className="mr-2 h-4 w-4"></Building>
              <span>Store Profile</span>
            </DropdownMenuItem>
          </DialogTrigger>
          <DropdownMenuItem className="text-rose-500 dark:text-rose-400">
            <LogOut className="mr-2 h-4 w-4"></LogOut>
            <span>Exit</span>
          </DropdownMenuItem>
        </DropdownMenuContent>
      </DropdownMenu>

      <StoreProfileDialog />
    </Dialog>
  )
}
Just to give some context regarding the trigger, read below:
// When you add asChild you want all the properties of DialogTrigger to be added into the DropdownMenuItem => opening the modal

<DialogTrigger asChild>
 <DropdownMenuItem>
  <Building className="mr-2 h-4 w-4"></Building>
  <span>Store Profile</span>
 </DropdownMenuItem>
</DialogTrigger>
To modify the variant/colors of a button or component that is already done by shadcn/ui you just need to go into the component and add the variants you want.
// button.tsx

success: "bg-emerald-500 text-white hover:bg-emerald-500 dark:bg-emerald-600 dark:hover:bg-emerald-600/80",
Install TextArea Component from shadcn/ui:
pnpm dlx shadcn-ui@latest add textareaCreate a file called store-profile-dialog.tsx that will contain all the content for the dialog:
– use values because defaultValues will load empty results since the API request has not started.
// store-profile-dialog.tsx

import { zodResolver } from "@hookform/resolvers/zod"
import { useQuery } from "@tanstack/react-query"
import { useForm } from "react-hook-form"
import { z } from "zod"

import { getManagedRestaurant } from "@/api/get-managed-restaurant"

import { Button } from "./ui/button"
import {
  DialogContent,
  DialogDescription,
  DialogFooter,
  DialogHeader,
  DialogTitle,
} from "./ui/dialog"
import { Input } from "./ui/input"
import { Label } from "./ui/label"
import { Textarea } from "./ui/textarea"

const storeProfileSchema = z.object({
  name: z.string().min(1),
  description: z.string(),
})

type StoreProfileSchema = z.infer<typeof storeProfileSchema>

export function StoreProfileDialog() {
  const { data: managedRestaurant } = useQuery({
    queryKey: ["managed-restaurant"], // identification for the same request in different places
    queryFn: getManagedRestaurant,
  })

  const { register, handleSubmit } = useForm<StoreProfileSchema>({
    resolver: zodResolver(storeProfileSchema),
    values: {
      name: managedRestaurant?.name ?? "",
      description: managedRestaurant?.description ?? "",
    },
  })

  return (
    <DialogContent>
      <DialogHeader>
        <DialogTitle>Store Profile</DialogTitle>
        <DialogDescription>
          Update the information from your store visible to your client.
        </DialogDescription>
      </DialogHeader>

      <form>
        <div className="space-y-4 py-4">
          <div className="grid grid-cols-4 items-center gap-4">
            <Label
              htmlFor="name"
              className="text-right"
            >
              Name
            </Label>
            <Input
              className="col-span-3"
              id="name"
              {...register("name")}
            />
          </div>
          <div className="grid grid-cols-4 items-center gap-4">
            <Label
              htmlFor="description"
              className="text-right"
            >
              Description
            </Label>
            <Textarea
              className="col-span-3"
              id="description"
              {...register("description")}
            />
          </div>
        </div>
        <DialogFooter>
          <Button
            variant="ghost"
            type="button"
          >
            Cancel
          </Button>
          <Button
            type="submit"
            variant="success"
          >
            Save
          </Button>
        </DialogFooter>
      </form>
    </DialogContent>
  )
}
One of the advantages of using React Query can be seen below, where the information requested by the API will be only requested once if the queryKey remains the same, you can just copy and paste the code in the Dialog that will not be requested again.
const { data: managedRestaurant, isLoading: isLoadingManagedRestaurant } = useQuery({
      queryKey: ["managed-restaurant"], // identification for the same request in different places
      queryFn: getManagedRestaurant,
})Check similiar articles below 🚀